 注: 建议图片大小150px*50px
丨
注: 建议图片大小150px*50px Views: 0 Author: Site Editor Publish Time: 2026-08-25 Origin: Site


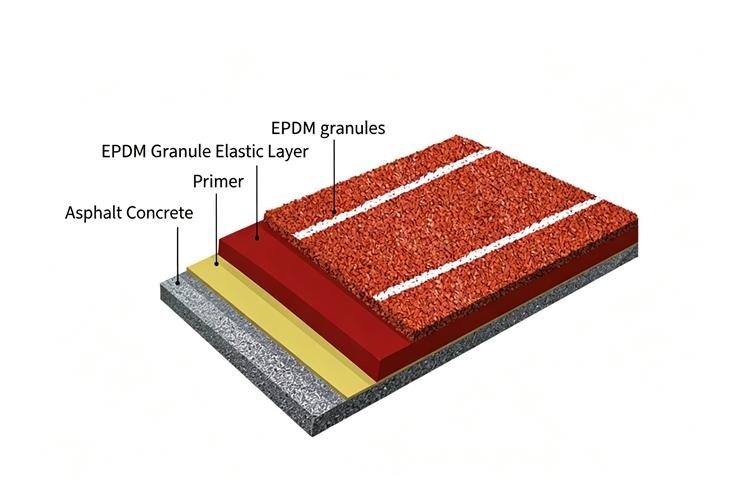
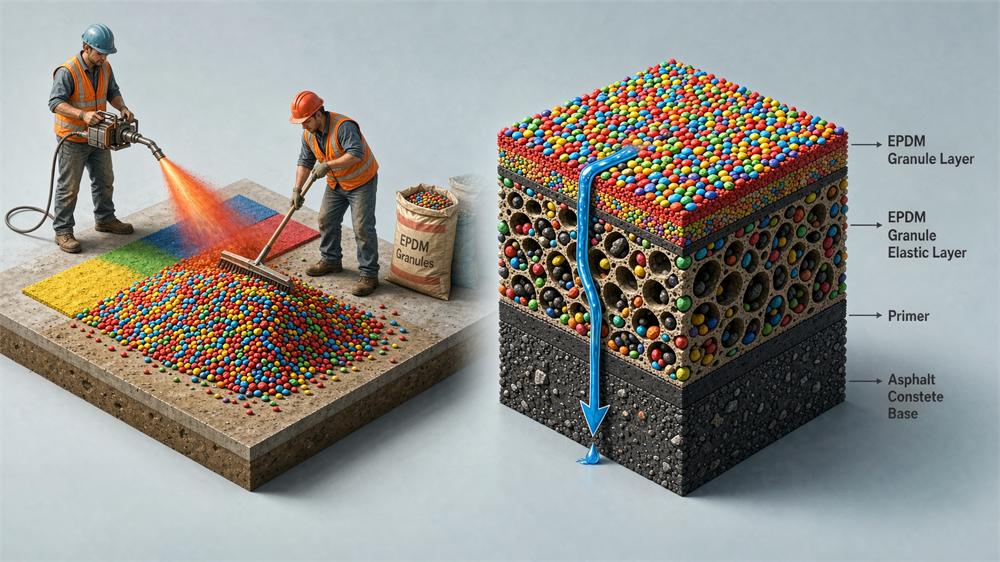
Features: Highly permeable and water-permeable; low foundation requirements; fast construction speed; high cost-effectiveness.
Thickness: Generally 13 mm.
Applications: Track and field facilities at elementary, middle, and high schools, as well as colleges and universities.
Common Materials: Polyurethane adhesive, EPDM granules, and other elastic granules.
Construction Guide for Permeable Running Tracks
I. Subgrade Preparation
(1) Cleaning:
The subgrade must be thoroughly swept clean prior to construction; it must be free of dirt and other loose debris.
(2) Subgrade Construction Method:
The primer for the specialized subgrade is Base Adhesive 300 or F605, which serves to enhance adhesion to the subgrade. Apply the primer (300D or F605) evenly to the subgrade surface using a roller at a rate of 0.15–0.2 kg/m².
II. Breathable Base Layer
The breathable base layer is made by mixing a single-component moisture-curing adhesive with 2–4 mm EPDM granules in a specific ratio, with the adhesive-to-granule ratio ranging from 1:6 to 1:7. The single-component adhesive is available in two specifications—RN-300 and RN-1045—for user selection. During normal construction, no additional materials should be added to prevent the finished product from exceeding chemical standard limits. When applying at low temperatures, 0.3%–0.5% organic tin catalyst may be added as needed to control the curing time.
(1) Mixing and Stirring: First, lay down plastic sheeting at the mixing site to keep the floor clean.
(2) The mixing time for the one-component moisture-curing adhesive and EPDM granules depends on the specific temperature and humidity; at 70% humidity and 25°C, the mixing time is 3–5 minutes.
(3) Avoid direct contact with moisture during mixing, and ensure the mixture is thoroughly and evenly blended.
(4) Pour the thoroughly mixed material into the paver and spread it quickly. Distribute the filler as evenly as possible, making timely manual adjustments. Manually level the edges created by the machine or at overlaps, and remove any excess or spilled material.
III. Permeable Track Surface Layer
The permeable track surface layer consists of a single-component adhesive, color paste, EPDM granules with a particle size of 0.5–2 mm or 1–3 mm, and rubber powder; or a mixture of two-component PU (ratio 1:2 or 1:3), EPDM granules with a particle size of 0.5–2 mm or 1–3 mm, and powder, stirred into a thin paste. The single-component adhesive is specified as RN-1045, while the two-component PU is available in two specifications—1:2 (102A:102B) or 1:3 (103A:103B)—for users to choose from. When applying two-component PU materials, add 0.3%–0.5% of an eco-friendly zinc-bismuth drying accelerator as needed to control the curing time. A suitable amount of leveling agent may also be added to improve flowability; however, the proportion of the leveling agent should be carefully controlled to prevent the finished product’s chemical indicators from exceeding standards. When selecting vibrant colors such as blue for the surface layer of a breathable track, the impact of yellowing caused by ordinary adhesives must be considered. It is recommended to apply two coats of water-based topcoat (at a rate of 0.3 kg/m²) after the surface layer has been sprayed to protect it and maintain the vibrancy of the color; however, this will also result in a slight increase in the surface hardness.
(1) When applying a single-component adhesive surface layer, lay down plastic sheeting in the mixing area to keep the floor clean. While mixing, move the mixer up, down, left, and right to ensure the material is thoroughly mixed before adding the EPDM granules and mixing evenly. The recommended ratio is: adhesive : granules : color paste : powder = 1.1 kg/m² : 1 kg/m² : 0.12 kg/m² : 0.2 kg/m². Spray the thoroughly mixed EPDM, adhesive, and color paste evenly onto the base layer surface, controlling the spray angle to ≤75 degrees. Spray once in each direction to prevent the sprayer from clogging; do not pause, and ensure continuous operation by optimizing material usage and labor.
(2) When applying the two-component PU topcoat, line the mixing area with plastic sheeting to keep the floor clean. First pour Component A (transparent liquid hardener), followed by Component B (colored paste-like base material), and then the powder. Pour as close to the center of the mixing bucket as possible; do not pour along the sides to ensure the material near the edges mixes thoroughly. While mixing, move the mixer up, down, left, and right to ensure the materials are fully blended before adding the EPDM granules and mixing thoroughly. The recommended ratio is: Adhesive : Granules : Powder = 1.2 kg/m² : 1 kg/m² : 0.2 kg/m². Spray the thoroughly mixed EPDM, adhesive, and powder mixture evenly onto the surface of the base layer. Control the spray angle to ≤75 degrees, applying one pass in each direction to prevent the sprayer from clogging. Do not pause; ensure continuous operation by optimizing material and labor resources.
(3) Local Touch-ups: Primarily manual touch-ups at edges, corners, and overlaps to ensure the overall surface is free of visible seams, uniform, and smooth.
(4) During construction, ensure materials are mixed according to the specified ratios. Stir thoroughly to ensure uniformity before spreading to avoid uncured material.
IV. Line Marking
The line marking paint is a two-component material with a hardener-to-white topcoat ratio of 1:3. A leveling agent may be added as needed during application. Measure and mark the boundary lines according to standard dimensions. Apply masking tape along both sides of the marked lines on the court. Use a short-nap roller with the specialized line marking paint to apply an even coat between the masking tape. Once the surface is completely dry, remove the masking tape.
V. Precautions
(1) When mixing materials, weigh ingredients accurately and stir thoroughly.
(2) The surface must be kept clean before each step of the entire construction process.
(3) Ensure adequate ventilation in indoor facilities.
(4) Allow the surface to cure for at least 3–5 days after installation before putting it into use.
(5) Construction must strictly follow this procedure. In case of special circumstances, please consult our sales manager by email; otherwise, our company assumes no responsibility for any construction quality issues that may arise.

